From The Archives: A previously published feature or tutorial that I’m sharing to showcase my writing and the kind of work I do.
Originally published in Linux Format #237
Nick Peers travels back in time to reveal how to transform your Pi into a fully fledged Atari machine.
You’ll almost certainly remember the late 80s when the 8-bit computing revolution gradually gave way to the rise of 16-bit machines. Atari and Commodore stood at the forefront of this revolution, with the Amiga eventually winning out. But for a while during the late 80s and early 90s, the Atari ST ran it close. And thanks to the brilliant Hatari, you can now resurrect the ST (and its successors) on your Raspberry Pi.
First steps
You’ll need a desktop environment to run Hatari – we’re using Raspberry Pi OS. The latest version of Hatari uses SDL2 to render graphics, so you’ll need to enable the OpenGL driver, noting that it’s still experimental and may be slightly unstable. It also means Hatari requires a Pi 2 or better to run optimally.
To enable the driver, open a Terminal window, type sudo raspi-config and hit Enter. Select Advanced Options > GL Driver > GL (Full KMS) OpenGL desktop drive with full KMS. Reboot when prompted.
From here, installation is simple: open Pi > Preferences > Add/Remove Software, type ‘hatari’ into the Search box and you’ll see one hit: tick this and click OK to install it. Once installed, open the Pi > Games menu – you’ll see two entries: Hatari and Hatari UI. Choose the former, where you’ll immediately come across a message about not being able to load a TOS file.
TOS is the Atari’s operating system, and comes in a range of revisions and versions depending on which 16-bit Atari machine you’re trying to emulate. Technically you should supply this yourself, but thankfully the hard work of obtaining any version of TOS has been done for you.
Before proceeding, a quick note about legalities: when running emulator software, it’s assumed in most cases you own the original computer as well as any software you play on it. From a legal standpoint, you should really honour this, but practically speaking there’s nothing but your conscience preventing you from running whatever you like, even if it’s no longer buried away in your loft somewhere.
Let’s begin by obtaining TOS for Hatari. Open your web browser and head to AtariWorld where you’ll find every single version of TOS from the original 1.0 release up to TOS 4.92 for the Atari Falcon. Which one do you need? It depends on what you’re planning to emulate. The original STFM model, which covers most bases, runs best on TOS 1.4, but you may want to download TOS 1.02 for some older games. Those emulating the STE want TOS 1.62, while TOS 2.06 (both STFM and STE) is a good choice when copying lots of files via the ST’s GEM desktop.
(A word to the wise – the TOS 2.06 ROM file has the wrong permissions assigned to it – you need to right-click the IMG file after extracting it and choose Properties > Permissions. Make sure ‘View content’ is set to Anyone and ‘Change Content’ is set to ‘Only owner’ before clicking OK and copying the file across.)
If you’re determined to stay the right side of the law and have no Atari gathering dust in the attic, try EmuTOS instead. It’s is a free version of TOS that can run on physical computers via floppy disk as well as your new Hatari emulator, but note it’ll be hit and miss what games and software you’ll be able to run on it.
When it comes to downloading each version, choose the ‘English UK’ link. A zip file will be saved to your Downloads folder, ready for use shortly. You now have all the elements you need to start configuring Hatari itself. The walkthrough reveals the key steps you need to follow.
STEP 1

Copy TOS file
Open File Manager. Double-click the downloaded TOS zip file to open it in Archive Manager, then drag the .img file into your Downloads folder. Once done, press F4 to open a Terminal window pointing to the Downloads folder and type the following (substitute tos102uk.img with the image file):sudo cp tos102uk.img /usr/share/hatari
STEP 2

Set system type
Now open the Pi menu and select Games > Hatari. Click OK at the ‘Could not load TOS file’ screen. When the main menu appears, click System. By default, Hatari is configured to emulate the STFM, but you can select a different Atari machine from the list. Tick ‘Boot faster by patching TOS & sysvars’ regardless of which machine you choose to speed loading times slightly.
STEP 3

Select ROM and RAM
Return to the main menu and click ROM. Click Browse to select the TOS image you copied across in step one – make sure it matches the Atari machine you’re emulating. Click ‘Back to main menu’ again, then click RAM. By default, 1MB is allocated, which should be adequate for gaming – you can allocate up to 14MB, but 2MB is a safer increase should you wish to.
STEP 4
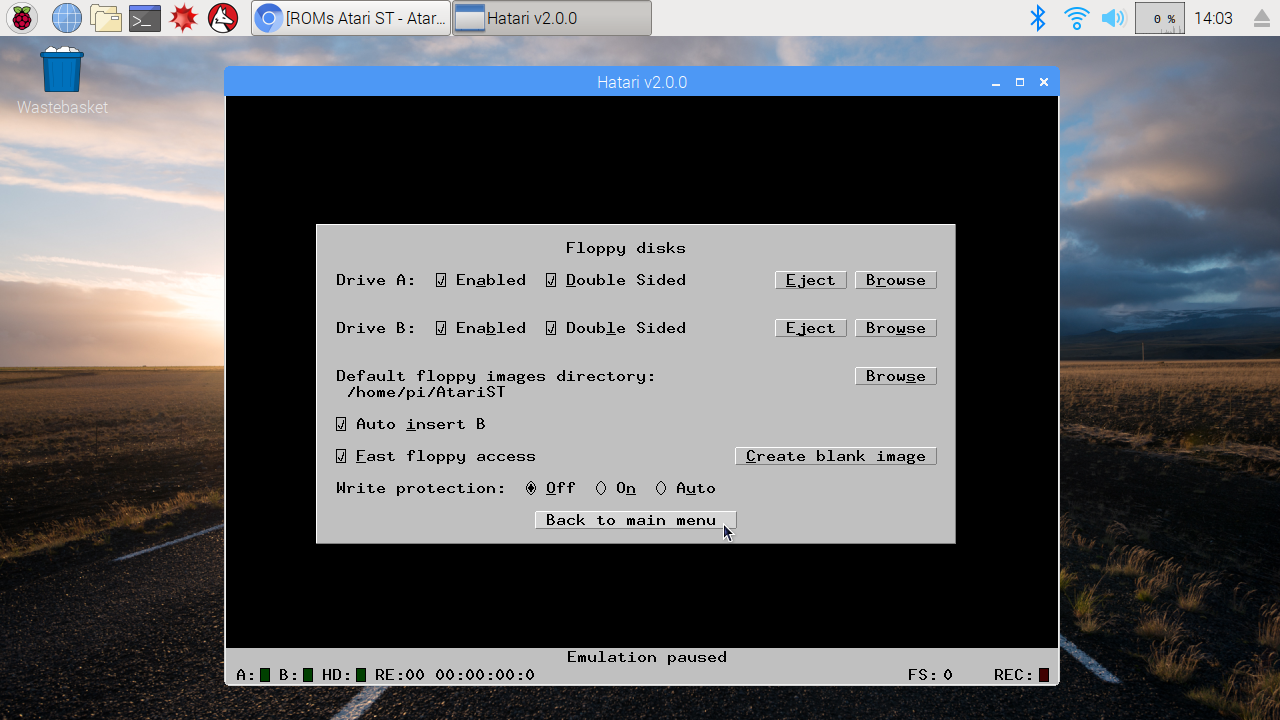
Select floppy disk and save config
Now click ‘Floppy disks’ followed by Browse next to ‘Default floppy images directory’ to select the folder you’ve stored your disk images in. Tick ‘Fast floppy access’ to help speed up loading times, but note that some disks may not work (in which case unticking this may help). Click ‘Back to main menu’ followed by ‘Save config’ to save your setup.
Download floppy disk images
As things stand, your Hatari setup is now a fully functional Atari machine – the only thing missing is software. Most games come on floppy disks, and once again the painstaking process of converting ST floppy disks into image files recognisable by your Pi has been done by others. All you need to do is locate and download these images, which come in MSA, ST or STX format.
There are a wide range of sites offering images – Google ‘Atari ST ROMs’ for a long list. If you can cope with the fact it’s French (Chromium will offer to translate the pages for you), then we like PlanetEMU in particular. Here you’ll find some games are listed several times based on who’s submitted the images – try one then download another if it doesn’t work.
As with ROMs, floppy disk images are downloaded in zip format, so you’ll need to extract them first, where you’ll be presented with files in .ST or .STX format (thoughtfully associated with Hatari, so you’ll see a nice floppy ‘ST’ icon to help identify them). These can be stored anywhere on your hard drive, but we recommend setting up a dedicated folder – say atarist – inside your home folder for easy access.
Play ST games
There are two ways to load floppy disks into Hatari. The simplest thing to do is simply browse to the folder containing your disks and double-click the .ST or .STX file. Hatari will launch using the configuration you’ve saved under hatari.cfg and then – after a pause that can be quite lengthy – the familiar green ST desktop will appear or the game will automatically load. Double-click the A drive icon if necessary, followed by the game file to start loading it.
If you plan to play a game that comes on two floppy disks, it’s easier to start things off inside Hatari itself: press F12 to bring up the configuration screen and click ‘Floppy disks’. Click Browse next to Drive A to load disk one into drive A, then repeat with Drive B for disk two. Leave ‘Auto insert B’ selected, then click ‘Return to main menu’ followed by OK.
Keep an eye on the status bar at the bottom of the screen, which should hopefully indicate the floppy disk is still loading – it can be a slow process, but check out the top tip for some possible tweaks to try. Once done, the game’s main screen should appear and it’s a case of navigating it with mouse, keyboard or – if you’ve got one plugged in and configured – game controller.
To set up the latter, press F12 and click Joysticks. From here you can select whether to disable the port, use a “real” joystick or define the keys used to simulate the joystick, namely up, down, left, right and fire. Up to four ports can be configured – two regular ST joysticks plus two additional STE-only joypads.
When it comes to using a real joystick, any game controller that’s plugged in and recognised by your Pi should be immediately visible – our wired PC/PS3 Gioteck controller was detected instantly, for example. As you’ll have seen when defining keys to simulate a joystick, ST joysticks were basic and only supported four directions of movement and one fire button – use the analogue stick and the top fire button to emulate the joystick, while the secondary fire button emulates the space bar key.
Create your own blank ‘floppies’
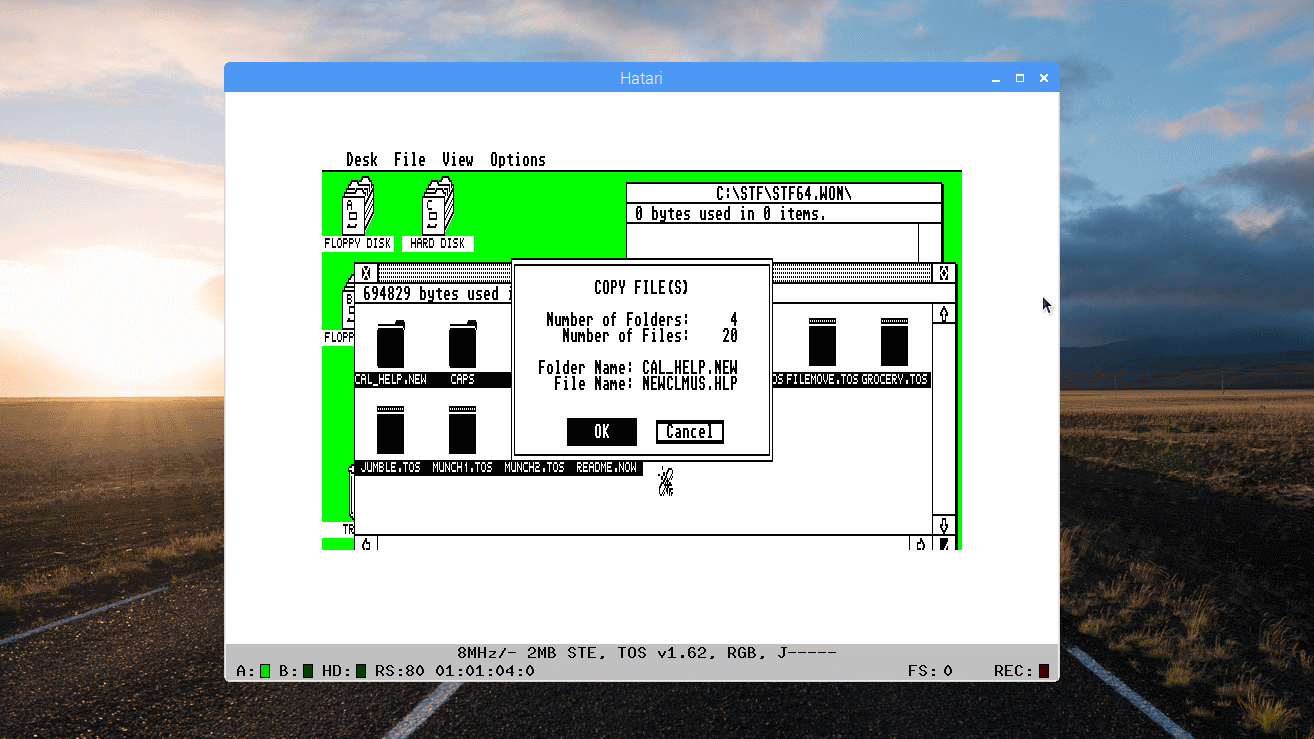
If you’re trying software that appeared on magazine covermount disks – yes, we’re talking ST Format – then chances are they were compressed to allow more content to be placed on the disk. You’ll need to extract these to a separate “disk” – we’ll cover hard drives in a moment, but if you simply want to run them from their own virtual floppy image, click ‘Create blank image’ on the Floppy Disks configuration screen. Leave the default settings – 80 tracks, 9 sectors and 2 sides – as they are, give your floppy a suitable label and click Create.
Next, choose where to save the floppy – your default folder is best – and again name it for the game you plan to copy to it. Click OK, then Back followed by ‘Drive B:’ to insert it into drive B. You can now either copy the compressed file across before double-clicking it to unpack the game or use the covermount’s own program to extract the files to the new disk. Be warned, it’s a slow process, and you may end up having flashbacks, or perhaps that’s just this former Disk Editor talking. Speaking of which, visit www.exxoshost.co.uk/atari/STF/ for a complete listing and download links for STF’s disks.
Beyond the basics
As things stand, you now have a fully working Atari machine, running at decent speed. If all you’re interested in is reliving some past glories, you should have everything you need to play games on your Atari. But you can push the envelope further too.
First, look beyond the ST as a mere gaming machine – it was also renowned as a music-making tool and as the games market waned, major applications continued to be developed, from video editing and word processing to desktop publishing. Visit PlanetEMU where you’ll have access to a wider range of titles, including demos, magazine cover disks, public domain releases and applications.
As the number of titles grows, you may get tired of having to press F12 to swap floppy disks around. Use the AltGr + d to swap disks, followed by AltGr + r to perform a warm reset or AltGr + c for a cold reset. Alternatively, why not connect a virtual hard disk to your ST – the box reveals the simplest way to add a single 80 MB ACSI hard disk. You can duplicate this blank image file to create multiple hard disks, but you can only connect one at a time. Another option is GEMDOS, which allows you to mount a folder on your Pi’s storage as a virtual drive, making it easier to copy files directly to the drive from your Pi storage. Note, however, that you’ll either need a dedicated hard disk driver or access the drive using EmuTOS, which supports GEMDOS natively.
Virtual hard drive
Floppy disks are all well and good, but they’re slow. Attach a virtual hard drive to your ST, and loading times are significantly quicker, plus you can easily switch between programs without having to swap out disks. Hatari supports three type of emulated hard drives: ACSI, IDE and GEMDOS. Of these, ACSI is the most compatible option and works with all versions of TOS from 1.02 up.
ACSI emulated drives exist physically as an IMG file, and can be fiddly to set up, plus they require drivers placed on the virtual hard disk to work correctly. Thankfully, Hatari provides you with an empty 80MB hard drive image, which you can download from https://hatari.tuxfamily.org/hd80mb.image.gz - simply extract the hd80mb.image file to a suitable folder, then open Hatari’s configuration, select ‘Hard disks’ and click Browse next to ACSI HD image to select the file.
Reboot your ST and you’ll see a new drive C appear, which you can copy files to from your floppy disks – you’ll find loading from this much quicker but beware that many commercial games will refuse to run from hard disk. For those that do (such as Civilization), just keep your games in separate folders for easy access, and make sure you save your configuration, so the hard disk is always accessible whenever you start your virtual ST.
If you find yourself getting into an old game or two, you may want to know how to save your progress. If the game itself has a save option, you could always create a blank floppy image as outlined earlier and insert it into drive B. Alternatively, you could use Hatari’s own memory snapshots feature, which are obviously quicker.
Start by pressing F12 and selecting Memory. Click Save, type a suitably descriptive filename (with the all-important .sav extension) and click OK. Return to your game, pressing AltGr + k at any time to update the saved file with your latest progress, or AltGr + l to reload your last saved state.
You can also snap screenshots at any point – press AltGr + g to take a screen grab in PNG format. Press AltGr + a to record an AVI movie (you’ll see the Rec button turn red in the Hatari status bar), and press it again to stop recording. Finally, press AltGr + y to start and stop recording your ST’s sound. All recorded material can be found in your home folder.
MIDI for musicians
The ST was a big draw from musicians with its built-in MIDI ports and was used by major artists including the likes of Queen for The Miracle. If you have a USB-to-MIDI cable you can hook up a MIDI keyboard to use with the likes of Cubase.
First, you need to verify your cable has been detected by Raspbian. Open a Terminal window and type the following:
lsusbYou should see your MIDI adapter listed. Now type the following, which should verify at least one MIDI port is available.
aplaymidi -lIf they’re available, open Hatari and press F12, then click Devices. Click the two Browse buttons under ‘Enable MIDI emulation’ and point them to whichever midi entry appears under /dev/snd. Tick ‘Enable MIDI emulation’ and restart your virtual ST.
If you don’t have a MIDI device, try a software MIDI synthesizer instead. First, install Virtual MIDI Piano Keyboard (search Pi > Preferences > Add/Remove Programs for ‘vmpk’). Next, launch QSynth from Pi > Sound & Video followed by VMPK. In VMPK select Edit > Connections, click the Output MIDI connection and choose FLUID Synth to connect the two. Hit the virtual keys and you should hear sound to verify it’s working correctly.
Now open a Terminal window and type the following:
sudo modprobe snd-virmidiaconnect -i -oMake a note of the client numbers, then type the following:
aconnect <sender> <receiver>Substitute <sender> with the client number of ‘VMPK Output’ and <receiver> with the client number of the first Virtual Raw MIDI port. Now repeat the command, this time substituting <sender> with the Virtual Raw MIDI port, and <receiver> with ‘Synth input port’ – for example:
aconnect 128 28
aconnect 28 13
Now open Hatari, press F12 and click Devices, then point it towards the correct connection. Tick ‘Enable MIDI emulation’, and you should be able to use your virtual synthesizer to input music into sequencing software like Cubase while listening back through Qsynth. Job done!
Emulate a Falcon
Atari tried and failed to launch several successors to the ST – Hatari can attempt to emulate most of these, from the Mega ST to the Atari TT, but the most interesting successor (and the one that effectively ended Atari as a computer manufacturer) was the Atari Falcon.
Unfortunately, you need a 2GHz processor to be able to do the Falcon justice, but you can get a taste of Atari’s final computer by setting up Hatari like so: first, select Falcon under System. Choose ‘Dummy’ for the Falcon DSP (if you subsequently try this on a PC with 2GHz or better processor, choose ‘Full’). Now select CPU and select 68030 as your CPU type, running at 16 Mhz. Choose TOS 4.04 for the latest stable TOS and allocate your Falcon 4MB of RAM from the Memory section.