One of the most important containers you’ll need to set up is a reverse proxy. If any of your containers are to be accessed from outside your network, you’ll need a reverse proxy to handle the redirection.
1. Install Nginx container
The following instructions cover installing Nginx from the Linux command line. Expand ‘Install on Podman Desktop (Mac/Windows)’ below if you’re running on either platform.
First, navigate to your container-data folder and create the following folders:
$ mkdir nginx nginx/data nginx/letsencryptNext, we need to expose port 80 and above to non-administrator access (if this is a dealbreaker, you’ll need to run Nginx Proxy Manager as a rootful instance – prefix all subsequent commands with sudo):
$ sudo sysctl net.ipv4.ip_unprivileged_port_start=80Now you’re ready to create the container. Again, copy and paste the below code into a text editor on your main PC, make the necessary adjustments (in italics) and then copy and paste (Shift + Insert) into Cockpit’s Terminal window before hitting Return.
$ podman run -d \
--replace \
--name=nginx-proxy-manager \
--net=host \
-v /home/username/container-data/nginx/data:/data \
-v /home/username/container-data/nginx/letsencrypt:/etc/letsencrypt \
-e PUID:1000 \
-e PGID:1000 \
docker.io/jc21/nginx-proxy-manager:latest
Install on Podman Desktop (Mac/Windows)
First, navigate to Images in Podman Desktop and click Pull. Type jc21/nginx-proxy-manager into the ‘Image to Pull’ field and click Pull image. Once downloaded, click Play and set it up as follows:
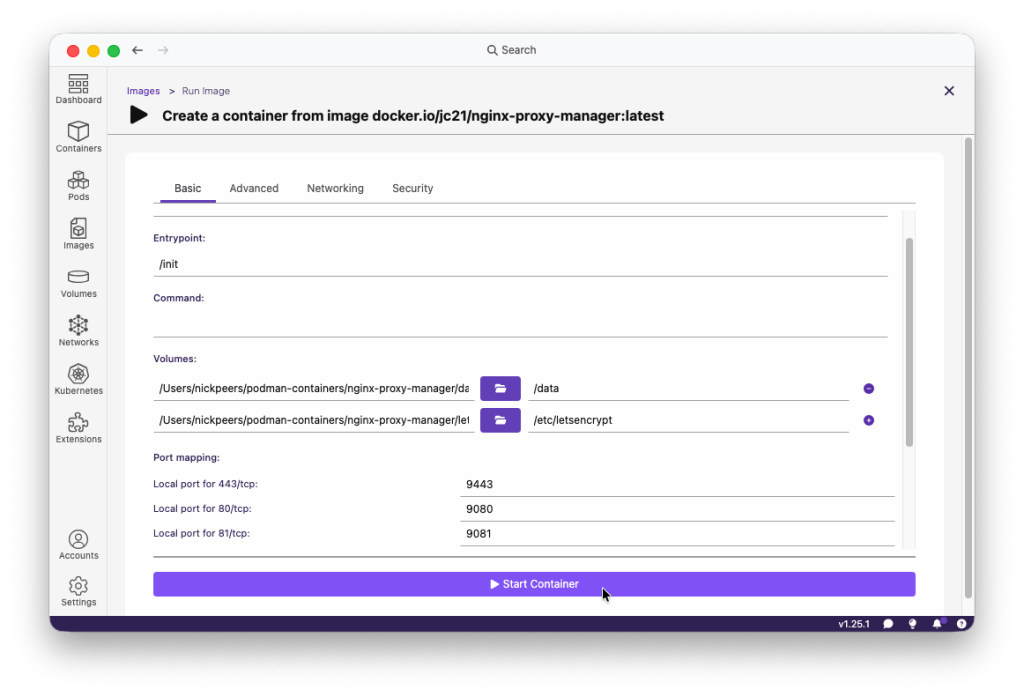
Basic tab: name it nginx-proxy-manager, and set up two volumes as shown in the screenshot above, one pointing to /data, the other to /etc/letsencrypt. Remap ports 443, 80 and 81 to ports higher than 1024 – say 9443, 9080 and 9081.
Advanced tab: set Policy Name to ‘Always restart’.
Click Start Container.
Navigate to http://localhost:9081/ to verify Nginx Proxy Manager is up and running (use port 9081 in place of 81 in all subsequent commands below).
2. First-run configuration
Once up and running, access your server’s IP through your web browser on port 81 – for example, 192.168.0.1:81.
Log in with admin@example.com (email) and changeme (password) before updating with new login details when prompted.
Before moving on, you need to log into your router’s configuration utility and redirect ports 80 and 443 – or whichever ports you’re forwarding to those ports (such as 9080 and 9443 in our example above) – to your server’s IP address via its port-forwarding tools. Make sure the destination device is your server’s network IP address (192.168.x.y) before clicking Apply.
3. Configure port redirects
Where appropriate – for example in the piece on Vaultwarden – we’ll provide specific instructions for configuring Nginx Proxy Manager to redirect that container as needed to access it remotely.
The big consideration when using Nginx Proxy Manager is that you need access to a domain or subdomain in order to make things work. This might be a domain you own or you can sign up for a free dynamic hostname from the likes of No-IP. You’ll also need to make sure that domain is set to point to your home network’s public IP address (get this from a site like https://www.whatismyip.com/) using your domain provider’s website.
Once done, when someone enters your domain name, it’ll be redirected to your router, which in turn will direct traffic to Nginx Proxy Manager. Nginx will then route the traffic to the correct location, providing you with remote access.
Nginix also allows you to easily set up free auto-renewing SSL certificates with LetsEncrypt, so https connections work with no problems (and are secure to boot).
One common issue is that your public IP address is likely to change over time (for example, every time your router reboots or restarts after a power outage). Rather than have to remember to manually check the IP address and make any changes manually, you can research automated solutions. They include:
- Client DDNS software installed on your PC, such as Dynamic DNS Update Client (DUCS) from No-IP.com for Windows, macOS and Linux.
- Routers with DDNS support built-in. Choose your provider (such as No-IP.com), enter your hostname and logon details, and your router will update the connection whenever your IP address changes.
- Install the ddclient package on your server and let it handle things. Keep an eye out for details of a script on how you can run this through a Podman container.