Nick Peers reveals how to set up the ultimate in privacy: your own self-hosted server powered by Linux.
Dare we suggest that everyone needs their own home server? In these febrile times where privacy is under threat and the rentier economy keeps finding excuses to ramp up the cost of online subscriptions, taking back control of your data and services is a no-brainer. And what better way to do so than set up your own basic home server?
There’s a free open-source equivalent for just about any online service you can think of, and you don’t need fancy hardware to get started – you can press an old PC, Mac or laptop into service if you wish. However, servers are designed to be run 24-7, so unless you want to run up a huge electricity bill, you might want to explore a dedicated low-power option, such as a Raspberry Pi 5 or mini PC based around Intel’s powerful – but energy efficient – 12th generation Alder Lake N100 chip. One such example is Beelink’s MINI-S12 Pro range – aim for 16GB and 500GB SSD, which would cost you around £220. If you have large amounts of data to store, then hanging multiple USB drives off this might not be practical, in which case, check out the Build your own server section below for a fully spec’d N100-based self-build with plenty of room for internal storage.
Build your own server
Build your own server
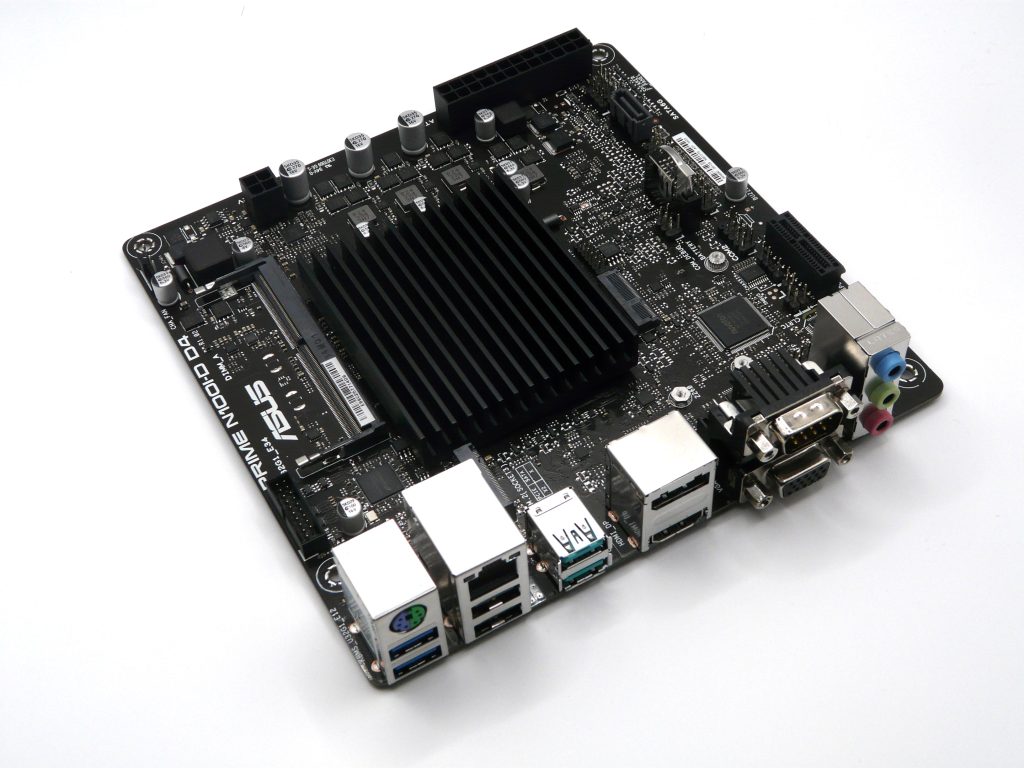
If you’re looking to build your own NAS replacement – something to rival a QNAP or Synology drive – then why not follow my own example? Here are the components I used (and how much they cost at time of writing in March 2025 – from www.scan.co.uk unless stated) to build my own N100-based server:
- MOTHERBOARD/CPU: ASUS PRIME N100I-D D4 (£100)
- RAM: Crucial 16GB 3200MHz DDR4 SO-DIMM (£29)
- CASE: JONSBO N2 Mini-ITX NAS Chassis (£140, www.watercoolinguk.co.uk)
- PSU: BeQuiet SFX Power 3 – 300W (£50)
- BOOT DRIVE: WD Red SA500 SSD – 500GB (£57) or 1TB (£84)
- SATA ADAPTER: ASM1166 M.2 M Key to 6-port SATA 3.0 adapter card (£24, eBay)
- 2.5GB/S ETHERNET PORT (optional): Startech ST1000SPEX2 (£26, www.startech.com/en-gb)
- TOTAL OUTLAY (minus additional storage): £400-£455
Get started
You’ll be running this server ‘headless’, which means that once it’s up and running, you won’t need a monitor, keyboard or mouse to access it on a day-to-day basis. Instead, you’ll be able to log on remotely through any browser to administer all aspects of your server using the brilliant Cockpit web-based frontend (https://cockpit-project.org/).
But let’s not get ahead of ourselves. First, we need to install our underlying operating system, and we’ve chosen the latest stable release of Debian (13) at time of writing) for the job. Head over to www.debian.org and click Download to save the netinst.iso (a mere 648MB) to your hard drive. You then need to create USB bootable media from this – most distros provide a tool for writing ISO files to disk, such as Startup Disk Creator in Ubuntu or USB Image Writer in Mint.
Once created, insert the USB drive into a spare USB port on your server PC, which should also be temporarily connected to a keyboard, mouse and monitor for the setup process. Boot from the drive, which should detect the Debian boot media and take you to its UEFI Installer menu. Leave Graphical Installer selected and press Enter. This works in a similar way to most distro installers, so work your way through it.
Install considerations
Certain parts of the process require careful consideration: the first is when Debian detects your network interfaces – if you’ve more than one network interface installed, you’ll need to select which one to configure (preferably the wired one for a faster, more stable connection). It’ll automatically be configured using dhcp – we’ll switch it to a static IP address post-install. For now, give your server a suitably identifiable hostname (such as server-pc or home-server) to make it easy to identify from other network devices before continuing. Skip the domain name prompt.
When prompted for a root password, leave it blank – this will set up Debian like Ubuntu-based Oses, where your own user account will be given administrative access via the ‘sudo’ command. When partitioning the disk, leave ‘Guided – use entire disk’ selected – LVM isn’t really needed for a server that will be administered by a single person. If you decide to create a separate home partition, which is where most of your data (including any Podman containers you set up) will be housed, the installer will allocate 30GB to the root partition and give the rest to your home partition.
After the drive has been partitioned, you’ll be prompted to scan additional media for the package manager. Leave no selected and click Continue. You may also wish to switch package manager to ftp.uk.debian.org when given the opportunity. Another important choice comes up when asked to select and install software – the key thing here is to untick both ‘Debian desktop environment’ and ‘GNOME’. You may want to tick ‘SSH server’ alongside ‘standard system utilities’, but it’s not necessary thanks to Cockpit.
Once the core packages have been installed, you’ll be ready to reboot – remove the installation media before doing so. Debian is now installed and it’s time to move on to the next step.
First boot setup
Leave the computer connected to your keyboard and display for the next step. The GRUB menu will appear, and after a few seconds, it’ll boot to a standard text-based login prompt. Enter your username and password and you’ll find yourself at the following command line prompt:
username@pcname:~$As this is a basic Debian install, you’ll be pleased to know the knowledge you’ve acquired using the Terminal on your PC is transferrable here. Let’s begin by creating a 4GB swap file to replace the parsimonious 1GB swap partition created during installation:
$ sudo fallocate -l 4G /swapfile
$ ls -lh /swapfile
The second command confirms the swap file is in place (owned by root) and ready to go. Now let’s install our Cockpit front-end. The version in the stable default repository is outdated, so let’s install the much more up-to-date build by enabling Debian’s backports repository:
$ sudo -i(After entering your password, you’ll be dropped to the root@pcname:~# prompt.)
$ . /etc/os-release
$ echo "deb http://deb.debian.org/debian ${VERSION_CODENAME}-backports main" > \
    /etc/apt/sources.list.d/backports.list
$ exit
Once returned to the main dialog, enter the following:
$ sudo apt update && sudo apt install -t trixie-backports cockpitTest connection
Next, type ‘ip addr’ to discover what IP address has been allocated to your server by your router. Now switch to your main PC and type the following into your browser’s address bar (substitute 192.168.x.y with your server’s IP address as listed on the inet line under your Ethernet adapter’s entry):
https://192.168.x.y:9090If Cockpit is running, your browser should flag up a potential security risk due to the lack of an SSL certificate. Wave this through – for example, Firefox users should click Advanced followed by ‘Accept the Risk and Continue’ – and you’ll find yourself at the Cockpit login screen. Simply log in with your server’s username and password to find yourself at the main Cockpit web interface, ready to explore (and further configure) your system.
Get acquainted with Cockpit
Annotation
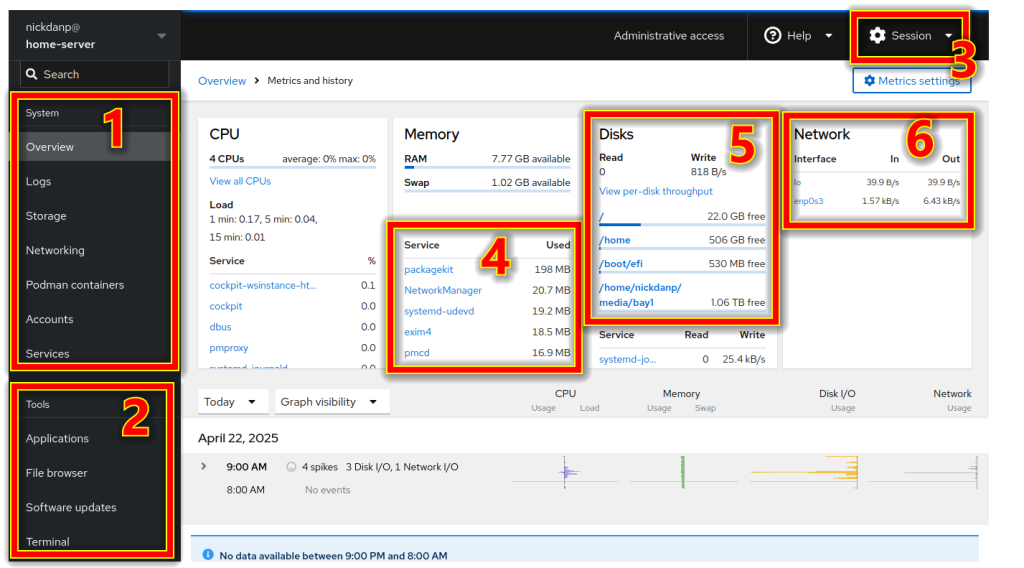
- System tools: Switch between Cockpit’s core tools here – each has its own page giving you access to different parts of the system.
- Tools: This section covers a range of apps and services – the File Browser is an optional add-on (see top tip).
- Session controls: Click here to switch themes and display language, manage SSH keys and log out of the current session.
- Services: Use the metrics to monitor services, then switch to the Services tab to manage them directly.
- Disks: Get an overview of how full your disks are getting from here – click any drive to jump to the Storage section.
- Network: Monitor all network interfaces – physical and virtual (such as Podman networks) from here.
The annotation reveals how easy your new server will be to monitor and administer going forward, but the first thing you’ll notice is that you’re running in ‘limited access mode’. Click ‘Turn on administrative access’ and re-enter your user password to gain full access to your system – you should only see this message going forward if cookies aren’t saved or you access from another browser.
The Overview screen provides a handy summary of your system – it’s here you’ll be notified that updates are ready to be installed via the Software updates section. There are also some handy summaries of your setup as well as a shortcut to reboot or shut down your server at any point. Under Usage you’ll see a link inviting you to view hardware metrics and history – clicking this provides more information about your CPU, memory and disk usage as well as the current network connection, but below this is a message telling you PCP is missing for metrics history. Simply click the ‘Install PCP support’ button to add the required packages.
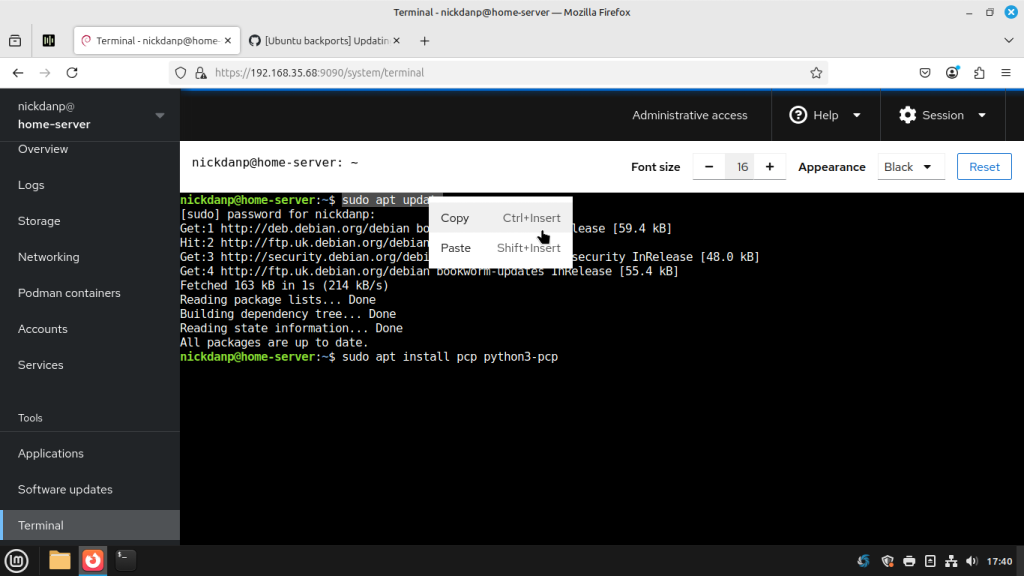
You can also install these via Cockpit’s Terminal emulator. Click Terminal in the left-hand pane where you discover you have direct access to the command line from here. Make a note of its handy clipboard support (Ctrl + Insert to copy from the Terminal, Shift + Insert to paste into it) alongside the ability to change the font size and background colour. To install PCP support from here, issue the following command:
$ sudo apt update && sudo apt install pcp python3-pcpSet static IP
You can expand Cockpit’s capabilities further with several plugins, but first let’s nail down your server’s IP address by assigning it a static address. This can be done from Cockpit’s Networking section. Here you’ll find your current network adapter and IP address is listed under ‘Unmanaged interfaces’. This indicates Cockpit can’t manage it because Debian doesn’t use NetworkManager by default.
We can fix this with a quick bit of work in the Terminal with the following command:
$ sudo nano /etc/NetworkManager/NetworkManager.confLook for the line marked ‘managed=false’ under [ifupdown]. Change this ‘managed=true’, then press Ctrl + X. Press Y followed by Enter. Next:
$ sudo nano /etc/network/interfacesComment out all the lines except ‘source /etc/network/interfaces.d/*’, then press Ctrl + X followed by Y and Enter again. Finally, reboot your server. If you can’t log back into Cockpit, check that your router hasn’t allocated it a different IP address by checking the Terminal output on your server (you’ll see Cockpit displays a message on startup explaining how to access it remotely).
When you log back into Cockpit and return to the Networking section, your network will now appear under Interfaces – click its name as marked in blue to access it status page where you can click Edit next to IPv4 to assign it a manual IP address. Select Manual from the dropdown menu, input your chosen IP address, leave netmask set to 255.255.255.0 and change Gateway to the IP address of your router.
After clicking Save, Cockpit will test your connection – click ‘Change the settings’ when prompted. Now reboot your server again and the new IP address should be in place permanently going forward.
Configure storage
Another key part of your server is – of course – access to your storage. This is done from the Storage section where any connected USB drives should appear alongside your primary drive and any additional hard drives you’ve installed. Pre-formatted drives like USB simply need mounting to a suitable folder on your filesystem – we suggest opening the Terminal, which defaults to your personal Home folder, then issuing the following commands:
$ mkdir media
$ cd media
$ mkdir bay1 bay2 usb1 usb2
You can name these folders whatever you like – just make sure there’s one for each drive attached to your server.
Once created, you can set up your drives and mount them to these folders. To set up a hard drive from scratch (including wiping any existing data or partitions), check out the step-by-step guide:
Step-by-step guide: configure new hard drive
Configure new hard drive
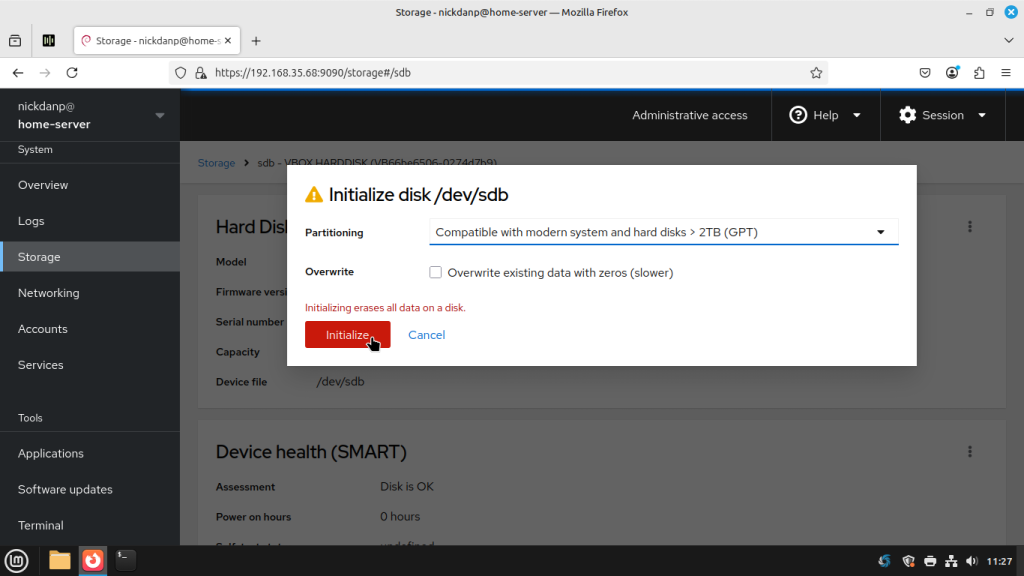
1. Set up new drive
Open the Storage panel where you’ll see all connected disks and drives (sda, sdb and so on). Use the Type and Size fields to identify each. To set up a new drive from scratch, click its entry. Click the vertical ellipsis button next to ‘Hard Disk Drive’ and choose Create Partition Table. Verify GPT is selected as shown and click Initialize.
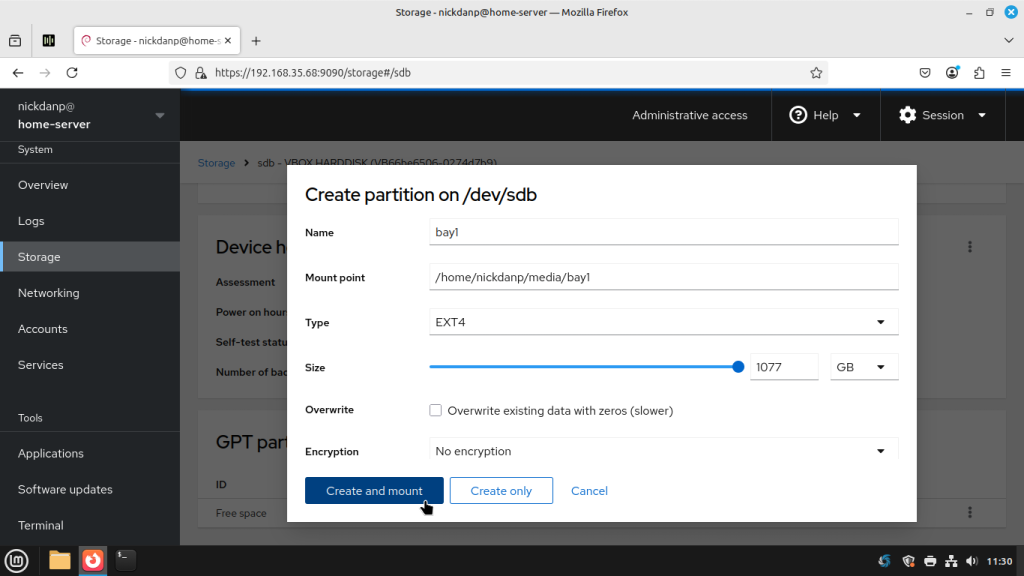
2. Create partition
Once done, scroll down to the GTP partitions section. Click the vertical ellipsis next to it and choose Create Partition. Give it a suitably identifiable name, then enter the path to the mount point on your system. Scroll down to check the other settings (if in doubt, the defaults can be left as they are). Finally, click Create and mount. After a short pause, the new partition should be listed.
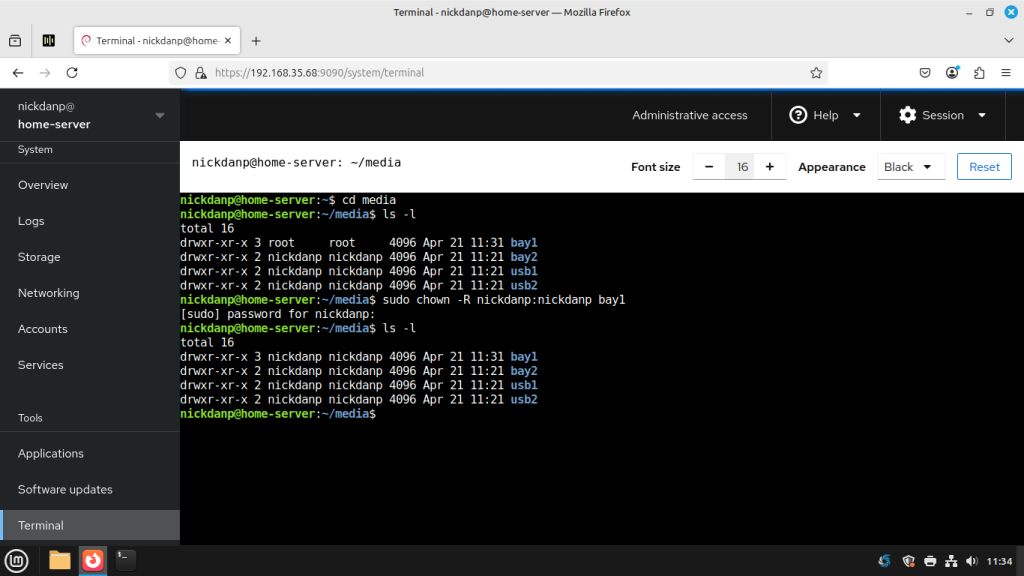
3. Claim ownership
Switch to Terminal and type ‘cd media’ followed by ‘ls -l’ to view the mounted folder’s properties. You’ll see root has taken ownership of the newly mounted drive. To reclaim ownership, adapt the following command to your folder name and username:
$ sudo chown -R nickdanp:nickdanp bay1Install Podman
Once your system is set up, it’s time to explore adding the services you plan to run from it. You can, of course, install these natively if suitable packages exist, but a better way is to run them all in sandboxed containers. They’re easier to administer this way, plus none of them has the ability to bring your entire server crashing down.
There are several choices when running containers, the best known of which is Docker. However, we recommend its open-source rival Podman. Podman is broadly compatible with Docker but has several advantages. First, there’s no parent daemon process, so one container crashing can’t affect the others. Second, Podman containers can be run ‘rootless’ so they don’t have access to potentially risky areas of your system. And finally, Cockpit offers a plugin that makes it easy to monitor your containers from its web-based interface.
Let’s start by installing Podman. One of the weaknesses of installing through the Debian repos is that you’re stuck with whatever version is available at the point of release. Thankfully, unlike the previous Debian release (Bookworm), Trixie’s version of Podman – 5.4.2 – has all the functionality we need. As a result, installation is literally just:
$ sudo apt install podmanOnce done, install the Cockpit plugin:
$ sudo apt install -t bookworm-backports cockpit-podmanPress Ctrl + F5 in your browser to force a refresh, and you’ll see a new entry marked Podman Containers. You can view, manage and even create containers from here, although we prefer setting them up directly from the command line (see the box).
Beyond your first container
Podman works in a very similar way to Docker, but there are differences. Visit https://docs.podman.io for an introduction to what it is, how it differs from Docker and the core commands you can use. What you’ll find when you go hunting for containers is that there’s plenty of online information about running them in Docker, but not much about Podman. Try searching for the container’s name and ‘Podman’ to see if someone has documented their own successful experiences. In many cases, simply substituting ‘podman’ for ‘docker’ may work, but in others you may need to perform some major surgery to get containers designed for rootful Docker to work in rootless Podman (if all else fails, you can run that container as ‘root’ by prefixing the podman command with ‘sudo’.
It’s impossible to compress into 200 words how to run a single container, never mind get you up and running with your choice of containers. Instead, I’ve plundered old tutorials from sister magazine Maximum PC, coupled with my own up-to-date experience running my own Debian-based server for the past 2½ years, to provide you with a selection of guides to help you extend your server’s capabilities over the coming days, weeks and months.
Click the Podman Containers link at the top of this page where you’ll read a guide to installing Podman in Debian 12 – you’ll see just how complicated it used to be (and dangerous – I broke my Debian 12 system over the course of a year due to the number of unstable packages I was installing).
You’ll also find guides in the drop-down menu to your own password manager (Vaultwarden), remote backup tool (Duplicati), Wireguard VPN server for secure remote access to your home network (wg-easy) and web proxy (Nginix Proxy Manager). More may follow in due course.
I’ve focused on providing instructions for getting the containers up and running, plus how to have them auto-start with your server – you can then explore the actual services via their website. I’ve kept things simple too – simply copy and paste the edited scripts into your Cockpit Terminal to run them. One final note: you’ll see a depreciated warning when you set up the containers as services – don’t worry, this can be ignored and they should work fine.