Discover a new, more secure way to run containers with Nick Peers.
I’m a huge fan of containers. They’re a great way to run self-hosted services on your network, and over the past few years I’ve covered them extensively in the pages of Linux Format, Maximum PC and MacFormat, from Nextcloud (cloud storage, chat and web-based office suite) and Immich (photo storage) to Vaultwarden (password management) and Motion (home surveillance system).
In the past, I focused on Docker as the tool for running these, but there’s a new pretender on the block, and what Podman lacks in finesse it more than makes up for in offering superior performance and security with ‘rootless’ containers. Having come out firmly in Podman’s corner, I thought it only fair to give you the full lowdown of the basics of using it on your Windows PC or Mac. In this feature, then, I’ll introduce you to the concept of containers, then reveal how to set up and run your own self-hosted services using a mixture of the user-friendly Podman Desktop tool and command line engine. I’ll also reveal how to deal with some of the idiosyncrasies of using rootless containers, plus help you get to grips with core – but poorly documented – features like autostarting containers with Windows and implementing a reverse proxy to give you access to your services from outside your home.
The basics
Let’s start by defining what a ‘container’ is. Think of it as a stripped-back virtual machine – whereas a tool like VirtualBox emulates an entire computer hardware and its underlying operating system, a container contains the bare minimum to run whatever application is required of it. Linux users can run containers natively, but Windows and Mac users will need to implement some form of compatibility layer first. Windows users will need to make use of the Windows Subsystem for Linux (WSL).
From here Podman will create a ‘machine’, a minimal version of Linux (Fedora if you’re interested) inside which your containers can run with just the specific files and dependencies they need. This means a container typically takes up tens of megabytes of space instead of gigabytes, it also means the container consumes far fewer resources than a virtual machine and any applications run inside it.
Although they share access to the underlying kernel, containers are designed to run in complete isolation to each other. In the case of Docker, a single daemon runs on top of these, and containers are given root access by default; Podman’s main selling points are greater security through rootless containers, plus greater stability and performance by eliminating the daemon process.
Windows users: Podman requires Windows 10 or 11 to run, with hardware virtualization enabled. To confirm this, right-click the taskbar and choose Task Manager, then switch to the Performance tab and select CPU. Check the Virtualization setting – if it’s Enabled, then it’s switched on; if it’s Disabled you’ll need to reboot into your UEFI/BIOS settings to enable hardware virtualization – consult your PC or motherboard manual for details of where to find it (look for a setting related to Intel VT, Intel VT-x or AMD-V depending on your CPU).
Mac users: Podman runs on both Intel and Silicon platforms.
Install Podman on Windows
From here, installation is a simple affair. Head over to https://podman.io/ and click the Download button to reveal two options: Podman Desktop and Podman CLI. For full functionality and a user-friendly management interface, choose the Podman Desktop option. Once downloaded and installed, the Podman Desktop window will appear, and you’ll be told that the underlying Podman engine requires installation.
Click ‘Set up’ followed by Next to install Podman itself. A series of checks will be run, and then you’ll be invited to install the latest build (4.8.3 at time of writing). Click Yes, make sure ‘Install WSL if not present’ is checked and click Install. If needed, the installer will install WSL – a reboot may be required – after which click Close.
Leave Autostart enabled, then click Next. You’ll be invited to create a Podman machine – click Next to bring up the wizard. Scroll down leaving the default settings as they are, then click Create to create your virtual machine (basically a minimal version of Fedora inside which all containers will be run). Click Next when done.
Your first container
Podman can be run directly through the command line or via Podman Desktop. The latter is more user-friendly and is useful for learning how Podman creates and runs containers, so we’ll start there. We’re going to install a perennial favorite as our first container: Vaultwarden, a lightweight (and unofficial) self-hosted implementation of open-source password manager Bitwarden.
As with all containers, visit its web page first to see how it’s put together – a good place to start looking is the official Docker hub where most popular containers (including Vaultwarden – see https://hub.docker.com/r/vaultwarden/server) reside. In the case of Vaultwarden, we can see it’s created using two Docker commands:
# docker pull vaultwarden/server:latest# docker run -d --name vaultwarden -v /vw-data/:/data/ -p 9000:80 vaultwarden/server:latestThe first command reveals the name of the ‘image’ that is used to create the Vaultwarden container, so our first task is to pull this image into Podman. This is done by clicking the cloud icon on the left of the Podman Desktop interface to navigate to the Images section. Click the Pull button in the top right corner where you’ll be invited to input the image name. Type vaultwarden/server here and click ‘Pull image’ – you’ll see the image downloaded in six parts – click Done when it’s finished.
You’ll now see the Vaultwarden image appear in the list as docker.io/vaultwarden/server. The docker.io portion refers to the registry that Podman pulled Vaultwarden from – in this case, the official Docker Hub. If you click the Settings button in the bottom left corner followed by Registries, you’ll see Docker Hub is one of four pre-configured registries supported, the others being Red Hat Quay, GitHub and Google Container Registry. You can connect an existing account to any of these using the Configure button next to the relevant entry, but they should all work without one.
Set up Vaultwarden
We’re now ready to ‘run’ Vaultwarden as a container. This is done by clicking the play button to the right of its entry to bring up the Run Image wizard. This is split into four sections, but for the purposes of launching Vaultwarden for the first time we only need to focus on the Basic tab. Everything you need to replicate from the ‘docker run’ command above can be found here.
Start by populating the ‘Container name:’ tab with ‘vaultwarden’. Leave the next two fields (‘Entrypoint’ and ‘Command’) alone and focus on the Volumes section. Volumes reveal an important part of how containers work: the container itself is immutable, which means every time you shut it down and restart it, the container (along its contents) is destroyed and recreated. Volumes allow you to store your settings in a physical folder on your PC, where data can be amended. These folders are then ‘mapped’ to folders inside the container, which ensures your settings and any other relevant data survive the container’s destruction.
Vaultwarden stores all your configuration data – including your encrypted password database file – inside such a volume. First, click the folder icon inside the ‘Path on the host’ field to select a folder on your hard drive where you’ll keep this data – we recommend setting up a dedicated Containers folder inside which you create a Vaultwarden folder for this purpose.
Next, click inside the ‘Path inside the container’ field to input the path you’re mapping your folder to inside the container – in the case of Vaultwarden, it’s /data/. Vaultwarden only requires a single folder mapped, but other containers may require more, in which case you’d just click the + button to the right of this entry to add additional entries.
Mapping network ports
Next, we come to the ‘Port mapping’ section. Containers communicate with the outside world through ports, and because there’s a danger that some containers may wish to communicate on the same port (port 80 is particularly popular), you can map different ports on your PC to ports inside the container to allow communication to flow freely.
Unlike volumes, container images usually pre-fill the ports you’ll need – in the case of Vaultwarden, both ports 3012 and 80 are required, and you’ll see while it’s a straight mapping of port 3012 to 3012, port 80 is remapped to 9000. This is because Podman makes all ports from 1 to 1023 off-limits to rootless containers for security purposes, although it’s likely to relax this rule in a later release. For now, however, you can leave the ports as they are or specify your own alternatives if you prefer – in most cases, they can be left alone.
Below this is a section called ‘Environment variables’ – this can be used to define all manner of custom settings. Vaultwarden supports an environment variable called SIGNUPS_ALLOWED – this allows you to prevent others from signing up for their own password accounts by setting it to ‘false’. If it’s not defined, signups are allowed – which you’ll need to set up your own account, so leave Environment variables blank for now.
You now have everything you need to get your Vaultwarden container up and running. Click the ‘Start Container’ button and you’ll be whisked to the Tty tab of your Vaultwarden’s container, where you’ll see a series of status messages appear that should hopefully confirm the container is up and running – in the case of Vaultwarden you should see a ‘Rocket has launched from http://0.0.0.0:80’ message.
This indicates Vaultwarden is listening internally on port 80 (which corresponds to port 9000 on your PC), so open your browser and go to http://localhost:9000 where you should find Vaultwarden is ready and waiting for you to set it up by clicking ‘Create account’. Do so and you’ll find yourself at the web vault screen.
Network fix
What you can’t yet do is access Vaultwarden from any other device on your network – this is a problem peculiar to the WSL implementation Windows uses (those running Podman on a native Linux install won’t have this issue) and is fixed by binding specific ports to the underlying Linux machine’s IP address.
To discover what this is, open an elevated Powershell window as an administrator – Windows 11 users can do this by right-clicking the Start button and choosing Terminal (Admin). Now type the following command:
# wsl hostname -I(If more than one entry appears, the first one – typically 176.23.x.y – is the correct one.)
Armed with this information you can ‘bind’ the port using another Powershell command. The following example ‘binds’ port 9000 to a WSL instance with an IP address of 172.23.247.76:
# netsh interface portproxy add v4tov4 listenaddress=0.0.0.0 listenport=9000 connectaddress=172.23.247.76 connectport=9000As soon as the command is issued, you should be able to access your Vaultwarden instance from another device on your network using your PC’s IP address – for example, http://192.168.0.2:9000. But don’t celebrate too soon: although Windows now does its best to maintain that IP address across reboots, at some point the IP address of your WSL instance may change and the fix will stop working. When this happens, issue the following command in an elevated Powershell window:
# netsh interface portproxy resetThen repeat the ‘wsl hostname -I’ command to get the new IP address and reissue the ‘netsh interface portproxy add’ command to point to its new address.
As you add more containers, you’ll find yourself opening more and more ports – you can review what these are using the ‘netsh interface portproxy show all’ command, making it easier to remap them when required. We expect Podman to better handle remote networking connections in a future release, but for now this workaround will do the job.
Recreating containers
Unlike with Docker, you can now close Podman completely and your container will continue running independently in the background. Reboot your PC, however, and you’ll see it’s stopped. You can relaunch it manually by opening Podman Desktop – wait a few minutes and you’ll see a series of status messages hopefully resolve themselves as ‘Podman is running’. Switch to Containers and click the play button next to Vaultwarden, but that’s a faff.
Instead, you can configure containers to automatically restart whenever they’ve been stopped – so after rebooting your PC, Vaultwarden will automatically start back up in the background.
To recreate the container with these new settings, you’ll first need to delete the current container by clicking the trash icon next to its entry under Containers. Once deleted, switch to Images and again click the play button next to the Vaultwarden image. The Run Image wizard will reappear – fill it in the Basic tab as before, but as you’ve set up your Vaultwarden account, now is a good time to input SIGNUPS_ALLOWED into the Name field under Environment Variables, followed by false into the ‘Value (leave blank for empty)’ field and click the + button to the right.
Now switch to the Advanced tab and you’ll see a Restart Policy section with a Policy Name dropdown currently set to ‘No restart’. Click this and change it to ‘Always restart’ – in theory, this should restart the container after every reboot. We say in theory, because by default Podman doesn’t restart any containers after you restart Windows.
The one-time fix involves creating a service inside your WSL instance to automatically restart rootless containers when the instance restarts alongside Windows. To do this, you need to log into the underlying Linux-based distro to issue some commands, again from a Powershell window. To enter the instance, type the following:
# podman machine sshWhen the ‘[root@PC-NAME ~] #’ prompt appears, type the following:
# cp /lib/systemd/system/podman-restart.service /home/user/.config/systemd/user/
# systemctl --user daemon-reload
# systemctl --user enable --now podman.socket
# systemctl --user enable --now podman-restart
# loginctl enable-linger $USER
What this does is ensure any containers set to automatically restart will do so when Podman is started. The final step, then, is to ensure Podman starts with Windows – if it’s not already doing so, head over to Settings > Preferences in Podman Desktop and ensure ‘Start on login’ and ‘Autostart Podman engine’ are both enabled.
Command-line usage
Recreating containers using Podman Desktop is a faff, and the good news is that if you learn how to use Podman from the command line you can recreate containers in seconds rather than minutes. Even better, Podman can be invoked from any shell, including Terminal (Mac) and both Powershell and the Command Prompt. Mac users will find the Terminal in the Applications > Utilities folder, while Windows users should simply right-click the Start button and choose Terminal (Windows 11) or Command Prompt (Windows 10).
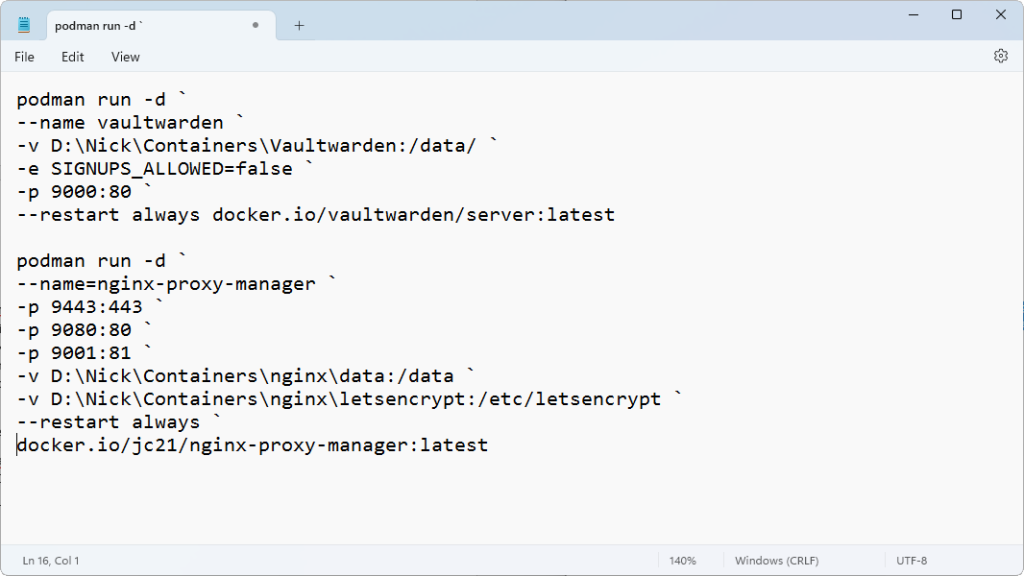
Containers are created (and recreated) using the ‘podman run’ command. Rather than type these in manually each time, we recommend setting up text files inside which you store commands like so:
podman run -d --name vaultwarden -v C:/users/username/containers/vaultwarden:/data/ -e SIGNUPS_ALLOWED=false -p 9000:80 --restart always docker.io/vaultwarden/server:latestIf this is difficult to follow, you can break this into multiple lines using the ` (Windows) or \ (Mac) symbol (see the screenshot).
You can then simply amend the command as required before copying it to the clipboard, switching to your shell window and pressing Shift + Insert to paste it in. Favor Powershell over Command Prompt and the command is color coded, helping you quickly verify it before hitting Enter.
Note, before recreating a container, you need to stop and remove it first – if Podman Desktop isn’t available, issue the following two commands:
podman stop vaultwarden
podman rm vaultwarden
Beyond the basics
You can now experiment with creating other containers too – when you’ve found one, try Googling its name and ‘podman’ to see if any specific instructions exist (for example, Jellyfin as a dedicated Podman section in its documentation at https://jellyfin.org/docs/general/installation/container), but if not, replicating the Docker instructions should work in most cases. Quick and easy! There’s just one problem left: while you can access your web vault easily on your machine via localhost, as soon as you try to log into it through another device or using your PC’s IP address, you’ll be told the browser requires HTTPS to access it. A quick visit to the Vaultwarden wiki (https://github.com/dani-garcia/vaultwarden/wiki/) reveals one of two options – the simplest by far is to set up a reverse proxy, and the final section below reveals how to do just that, not just for Vaultwarden but for any services you add that require access from outside your home network.
Set up a reverse proxy
Many services you set up – Vaultwarden among them – work best when they can be accessed from outside your home network. We’ve covered reverse proxies before – they basically make it possible to redirect traffic from outside your network to the appropriate service, and our favorite proxy by far is the user-friendly Nginx Proxy Manager, which comes in container form.
For this to work, you need to configure both Vaultwarden and the Nginx Proxy Manager to be able to communicate with each other. This can be done by running both containers in a ‘pod’. Assuming your Vaultwarden instance is up and running, the next step is to set up Nginx Proxy Manager.
First, navigate to Images in Podman Desktop and click Pull. Type jc21/nginx-proxy-manager into the Image to Pull field and click ‘Pull image’. Once downloaded, click Play and set it up as follows:
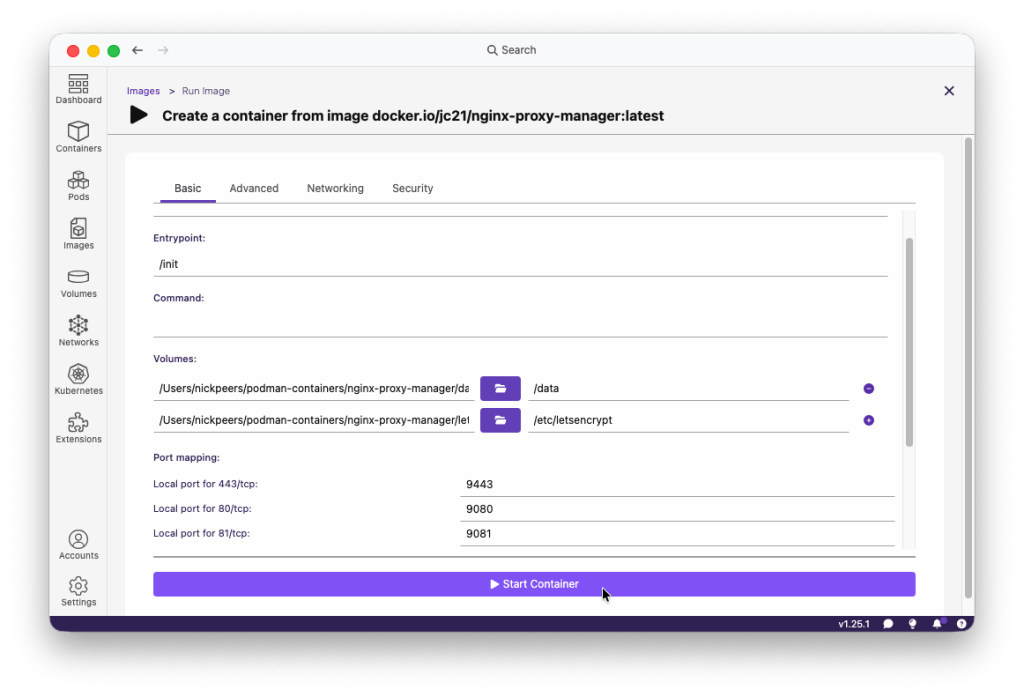
Basic tab: name it nginx-proxy-manager, and set up two volumes, one pointing to /data, the other to /etc/letsencrypt. Remap ports 443, 80 and 81 to ports higher than 1024 – say 9443, 9080 and 9081.
Advanced tab: set Policy Name to ‘Always restart’.
Click Start Container.
Navigate to http://localhost:9081/ to verify Nginx Proxy Manager is up and running. Finally, head over to https://linuxformat.com/archives?listpdfs=1 where you can download our sister title Linux Format’s four-page guide to configuring and setting up Nginx Proxy Manager for free, allowing you to use Vaultwarden and other container services from outside your local network.