Discover how to run dozens of different services through one platform.

The prime function of your server is to provide services to the rest of your network. Some – like those in our top 5 box on the previous page – can be installed natively, but others require a form of virtualisation called Docker. Docker provides so-called ‘containers’, lightweight virtual machines inside which you can install a minimal version of Linux along with the app or service you wish to run. The good news is that most containers come with all the hard work of installing and configuring already done – all you need to do is run them with a few user-defined settings, such as linking the container to one or more physical folders on your server containing your container’s settings and data. You can also configure ports to allow the container to communicate with the outside world.
Start by heading over to https://dockers.docker.com/desktop/install/mac-install to download the correct version of Docker Desktop for your Intel or Silicon-based Mac, then follow the ‘Install interactively’ instructions, choosing the recommended settings when prompted. You’ll need to set up or sign into a Docker Desktop account, but the good news is that it’s completely free for personal use.
Once done, you’ll find yourself at the Docker Desktop interface. Let’s set up your first Docker container: a self-hosted password manager called Vaultwarden, which is based on the brilliant Bitwarden. Self-hosting means you don’t have to entrust your passwords to a third party, thereby risking being part of one of several well-documented password breaches. The step-by-step guide at the bottom of the page reveals how to set it up through Docker Desktop.
This approach is friendly and easy enough to follow, but it’s slow and quite restrictive. It’s actually quicker to set up containers from the Terminal – for example, you could have created your Vaultwarden container with just two commands:
docker pull vaultwarden/server:latestThis downloads the latest version of the Vaultwarden container image. When you see a message confirming the download is complete, enter the following command:
docker run -d --name vaultwarden -v ~/containers/vw-data/:/data/ -p 80:80 vaultwarden/server:latestWhether you install through Docker Desktop or the command line, the Vaultwarden container will appear in the Docker Desktop app, allowing you to stop or restart it, destroy it completely and more besides.
Visit https://hub.docker.com to go hunting for more containers to try – three examples to look out for are cloud storage solution NextCloud (nextcloud/all-in-one), home surveillance server Motioneye (ccrisan/motioneye) and audiobook streaming server Audiobookshelf (advplyr/audiobookshelf).
Some are more complicated to set up than others, but the beauty of Docker is that if you make a mistake during setup, simply click the trash icon next to the unwanted container to destroy it, then recreate the container as before – all without losing any data or settings.
For example: once you’ve set up your own password account in Vaultwarden, destroy the container and repeat the step-by-step guide again, only this time set the ‘SIGNUPS_ALLOWED’ value to ‘false’, which prevents anyone else from being able to sign up through your server.
Configure remote access
As things stand, all your containers can only be accessed through your local network. To widen access to outside your home, you’ll need three things. First, a suitable domain, such as yourname.com, or a dynamic hostname (free ones can be found at www.no-ip.com). Next, you need a tool to redirect the domain to your home network – use the free RealDNS app, which works with most popular domain providers.
Finally, you need to create another docker container – NGINX Proxy Manager – which redirects traffic from outside your network to the correct containers inside it. After configuring your router’s port forwarding settings to redirect traffic on ports 80 and 443 (plus any container-specific ports) to your server’s IP address, connect to NGINX through your web browser to redirect traffic based on domain or dynamic domain. Click here for a detailed guide to setting it up – the instructions are for Docker alternative Podman, but work in exactly the same way (just substitute ‘docker’ for ‘podman’ where applicable).
Create your first container


1. Download container image
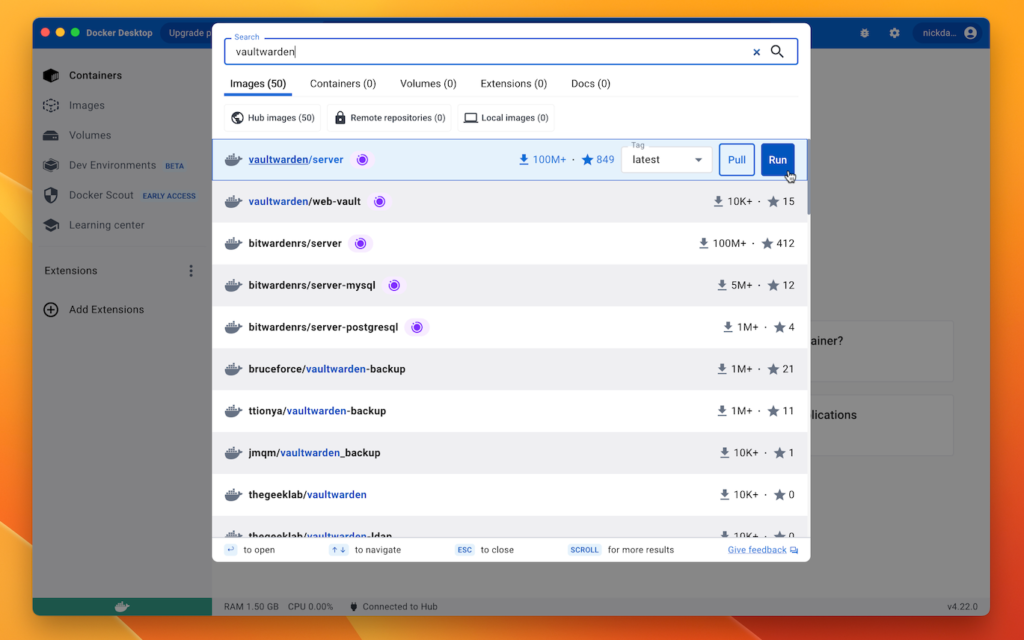
Type ‘Vaultwarden’ into Docker Desktop’s search box. Select ‘vaultwarden/server’ from the list of results. Verify Tag is set to ‘latest’ to download the latest stable version, then click the Run button and wait.
2. Name container
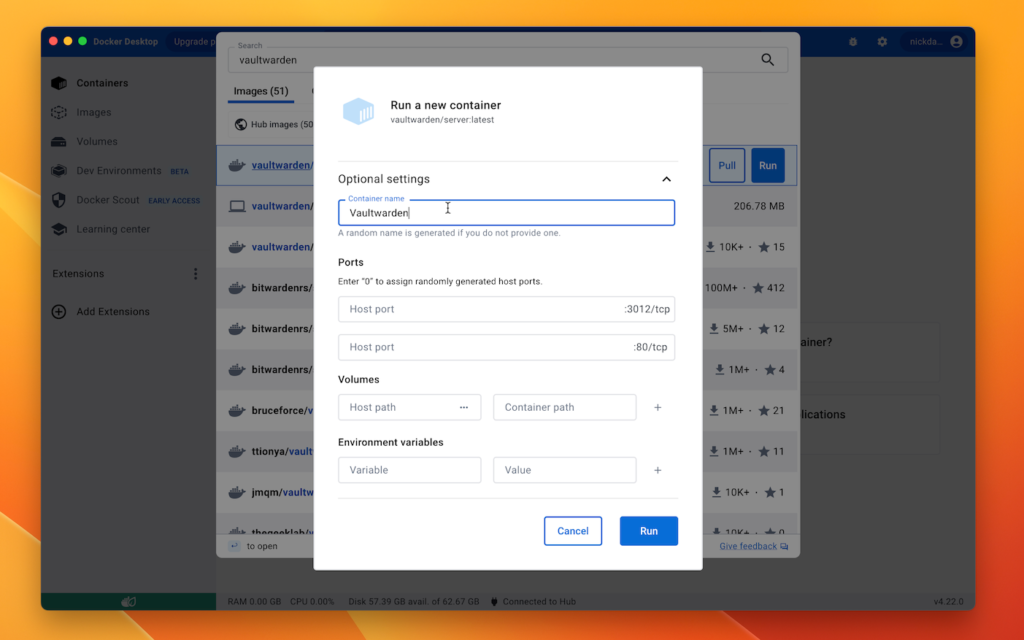
It’s a 206MB download, so be patient. Once complete, click ˅ next to ‘Optional Settings’ to reveal key configuration details you need to supply. Start by giving your container a suitably descriptive name – like Vaultwarden.
3. Open network ports
Vaultwarden communicates over two network ports: 312 and 80. You need to map these to two available ports on your Mac: 312 is usually free, but you may need to change 80 if it’s already in use by your server.
4. Map volumes
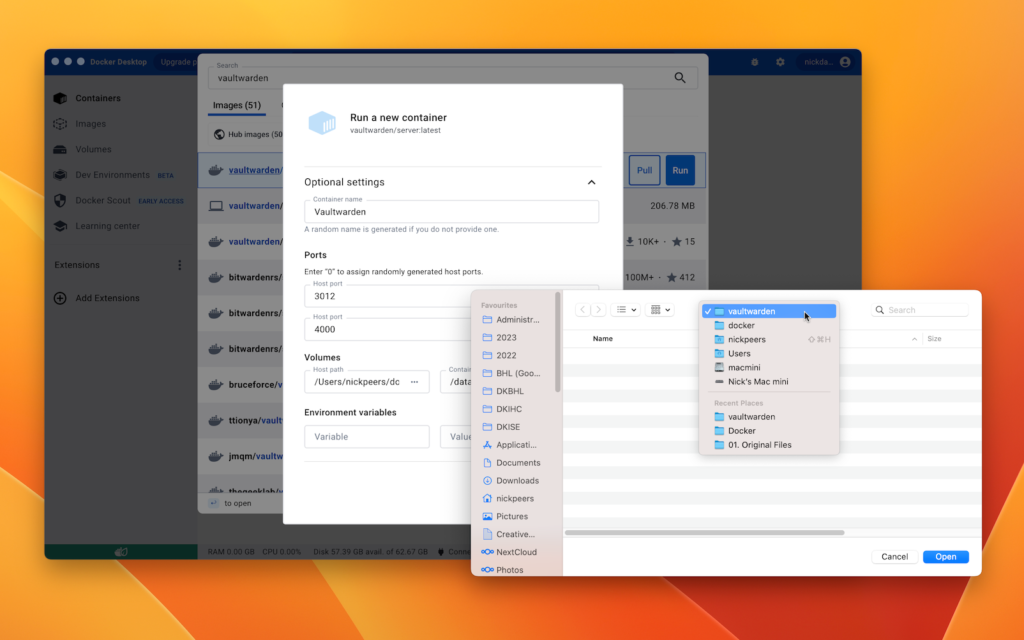
Next, type /data into the Container path box as shown – this is the location of your passwords and other settings. Click … next to Host Path to choose a folder on your hard drive where the data will physically reside.
5. Define variables
Environment variables let you tweak other aspects of the container. In the case of Vaultwarden, you need a variable called ‘SIGNUPS_ALLOWED’ with a value of ‘true’, so add this before clicking the Run button.
6. Test container
After a short pause, Vaultwarden should display a log indicating it’s started correctly. Select Containers from the left-hand menu and click the 80:80 link under Ports to open Vaultwarden in your web browser, ready for use.